
In this article the aim is to learn Amibroker in under a hour. This is not a complete Amibroker tutorial but it covers all the features I find most important for trading. If you want to learn how to use Amibroker then this is for you.
If you’ve never head of it, Amibroker is a powerful tool for technical analysis and backtesting. The software lets you scan, plot charts and run portfolio-level backtests.
With a little bit of programming, you can do anything you like with Amibroker. But the main reason that I love Amibroker is its speed. By using array processing, Amibroker is able to perform backtests more efficiently than other platforms.
This provides the ability to quickly test new trading ideas. This is crucial because I don’t want to spend a lot of time on mediocre trading ideas. I want to test an idea, see if it’s good and then move on. In the rest of this article, you’ll learn how to get started using Amibroker in under an hour.
Table Of Contents
- Installation And Set Up
- Amibroker Charts
- Amibroker Analysis
- Amibroker Formula Language
- Tips And Tricks
- Common Mistakes
1. Amibroker Installation And Setup
The first thing to do is visit Amibroker.com, purchase and download the software. You can also take the Amibroker trial where you can evaluate the program for 30 days.
After purchasing Amibroker you’ll also want to buy Amiquote which is an Amibroker data plugin that imports free historical data. The plugin imports the data straight into Amibroker so you can do your analysis.
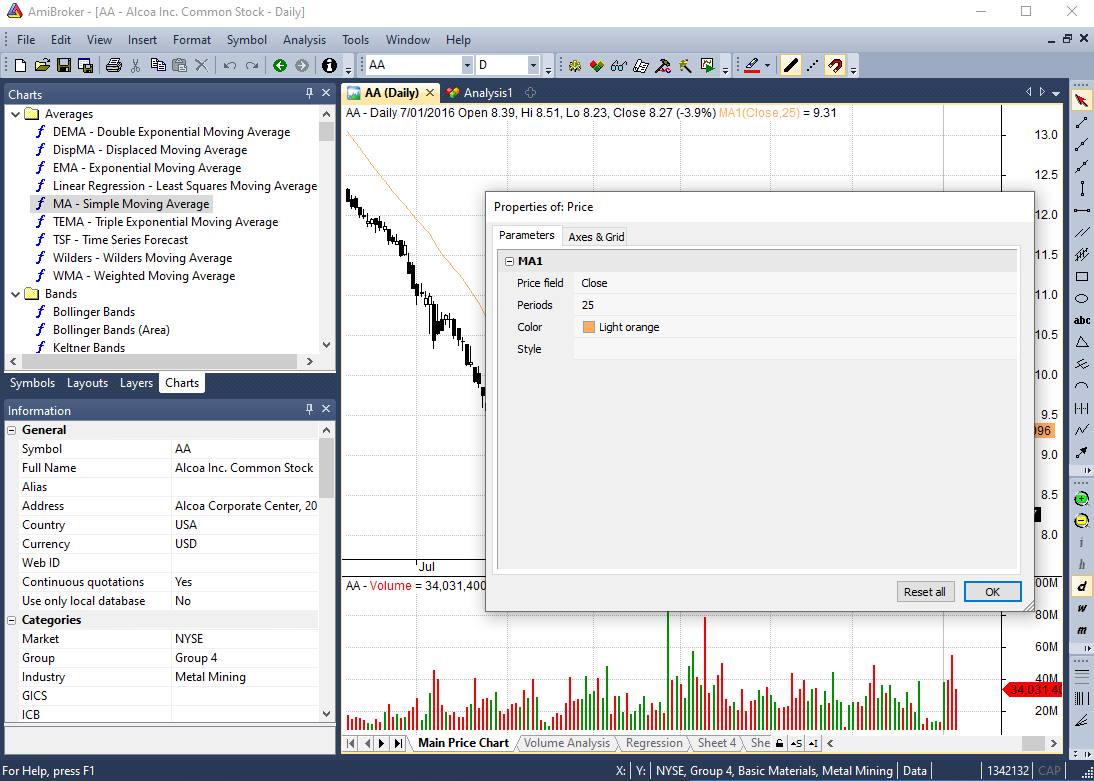
Once you’ve got everything installed you can load up Amibroker and it’ll look something like this:
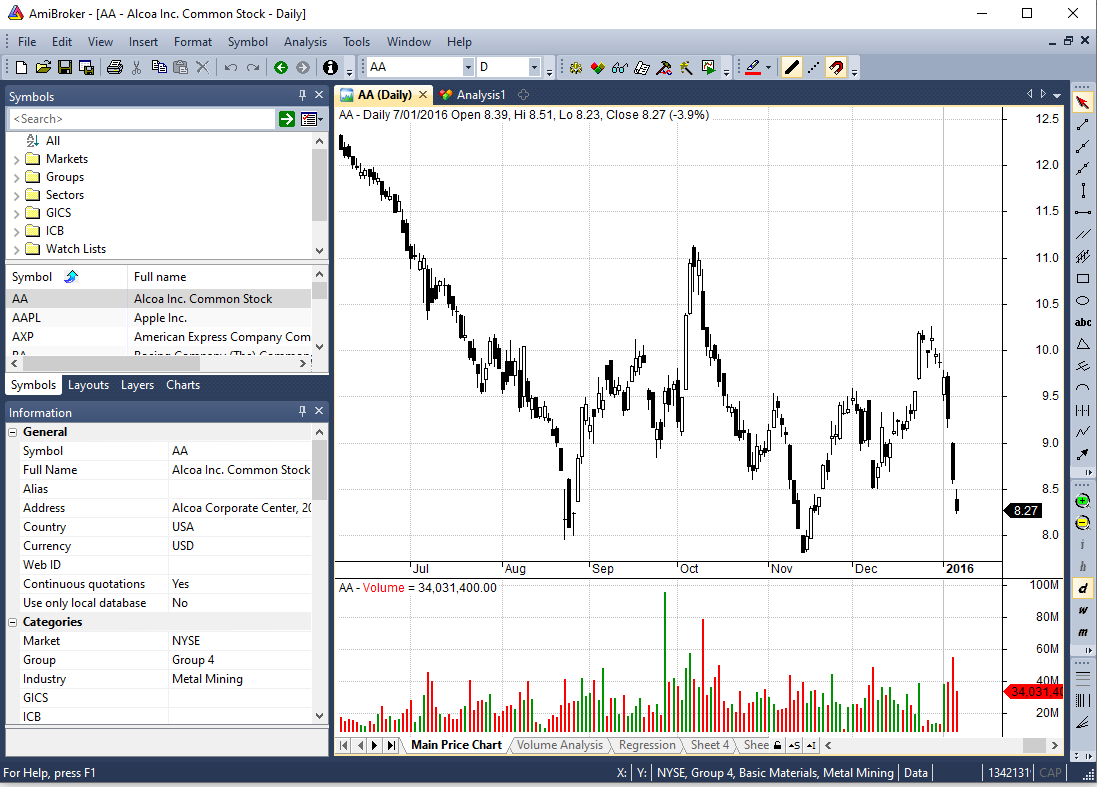
Straight away, you’ve got a typical windows setup. You’ve got a main price chart window with technical indicators, and you’ve got your symbols, chart options and information on the left hand side.
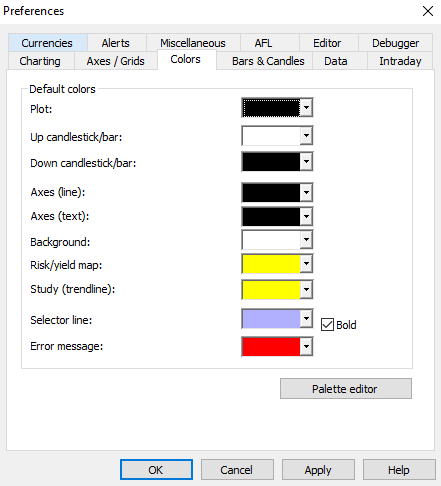
One of the first things you’ll want to do is to customise the look of the charts and the layout of your windows. You can go to Tools >> Preferences and change a number of settings such as charting, axes/grids, colors etc.
If you click Window in the main toolbar you can select which windows you want open and which to remove. You can also make the windows fixed or floating. Floating means the windows can be moved around on to different screens.
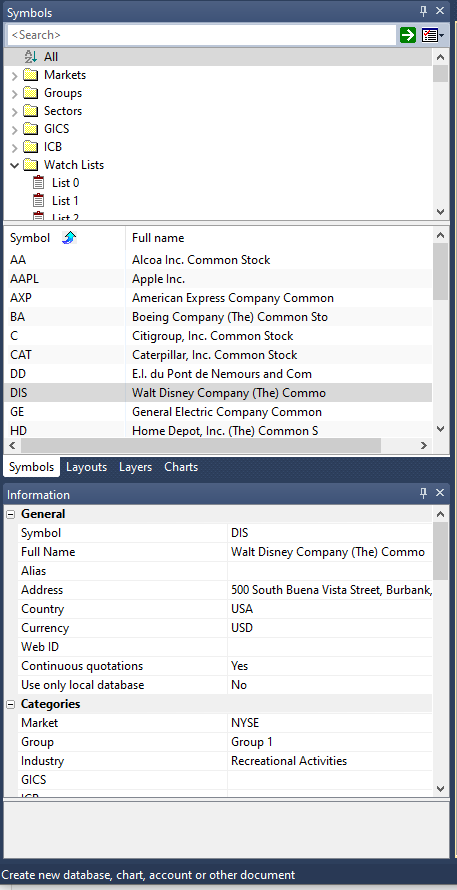
If you look at the Symbols list on the left you’ll see there is already a database installed. Some US stock tickers have loaded up such as Alcoa, Boeing, Citigroup etc. This is the default Amibroker database that comes with purchase.
Learn Amibroker Databases
Amibroker works using databases. What you get out of Amibroker is only going to be as good as the data you put in. To create a new database you go to File >> New >> Database. This is where you build the database of stocks that you want to do your analysis and backtesting on.
Once you create a new database, you have the option of pulling data straight in from a third party plugin. There are options such as CQG, Esignal, Interactive Brokers and Norgate. My stock data provider is Norgate which works seemlessly with Amibroker. We will look at this more closely later.
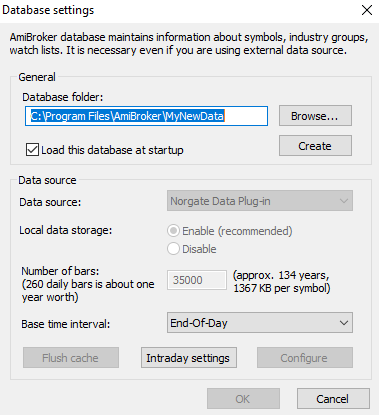
You can import different time frames, not just daily prices. You can go all the way down to 1-min and tick data if you want. The shorter the timeframe the bigger your database is going to get. So if you want 5 years worth of 1-minute data, you will need to set the number of bars to roughly 650,000. If you have 20 years of EOD data you will need to set the number of bars to roughly 5500.
The Amibroker import wizard (File >> Import Wizard) is really useful for importing any data that you have which is in a format such as CSV. You can use the wizard to import stock data, sentiment data, fundamental data etc. This means you can import your data without the need of a third-party plugin.

Free Data For Amibroker
One option if you want historical data and don’t want to pay for it is to use Amiquote.
The first thing you’ll do is to create a new database, and call it something like S&P 500 or Amiquote Data.
Then you open up Amiquote and Amiquote is going to download data from one of the available sources and import that data straight into your Amibroker database. Here is a screen grab showing the Amiquote interface:

What you need to do is go to File >> Open and open up a list of ticker symbols. You’ll find that there are already some installed for you in the Amiquote folder. They come in the .tls file format. Here is a list of Nasdaq 100 tickers already created:
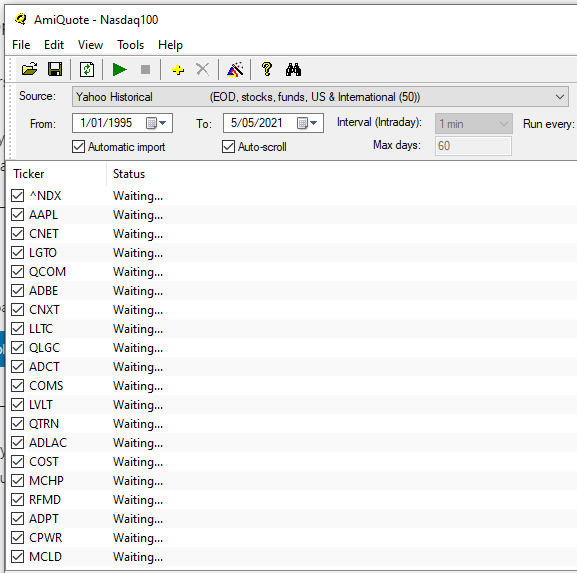
Once you have your list of symbols, set a date range and pick a data source such as Yahoo! FInance. Next, click the green arrow to start the download. That will automatically populate your Amibroker database with the data for all of those ticker symbols.
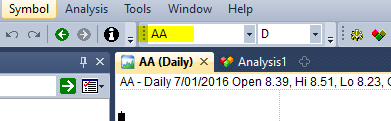
Next time you go into Amibroker, each ticker can be loaded up by clicking in the symbol box at the top.
You can also access the tickers via the Symbols window. You’ll find that Amibroker is now filling up with the data for all of those stocks.
Problems With Free Data
Before we move on, I should point out that free data is really good for getting started. A lot of the time it’s pretty accurate. But there are also problems with free data which you should be aware of. This is especially true when you’re dealing with less liquid securities such as small cap stocks.
Free data isn’t always reliable. It can contain holes and is not always adjusted for corporate actions like stock splits. Stock splits, specifically, can create large price gaps in your historical data that don’t really exist. To run a serious backtest you’ll want to pay for data that has been properly adjusted and taken care of.
As I mentioned before there are many data providers available. Norgate is what I use for end-of-day equity data and it’s a very good choice for Amibroker users. I can also recommend data from Sharadar for fundamentals and eSignal for intraday data.
2. Amibroker Tutorial – Charting
Learning how to use Amibroker would not be complete without looking at charting. Amibroker provides lots of technical analysis tools and indicators that we can look at.
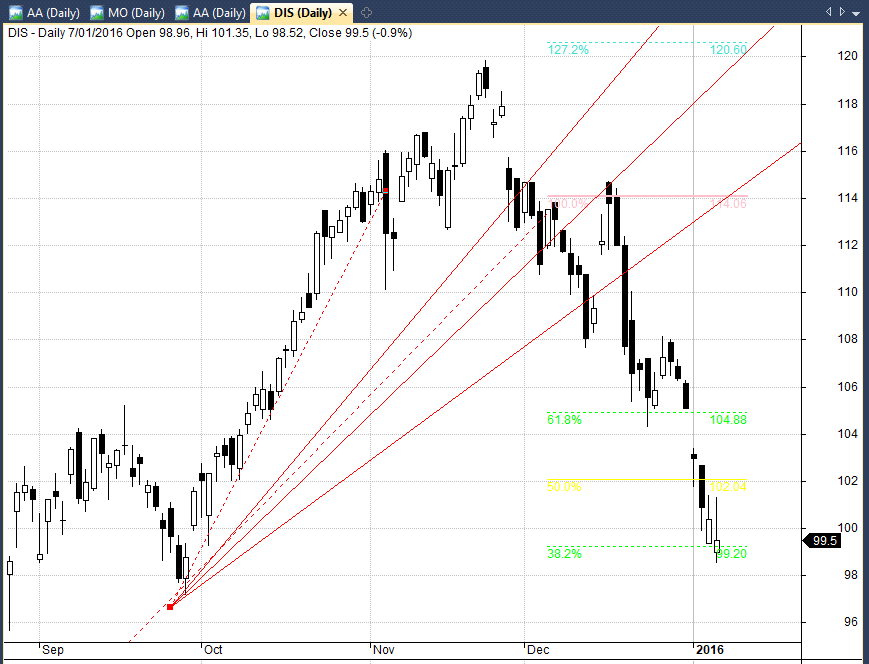
Once you select a stock symbol, the data will populate in the main chart window. Hover your cursor over any price bar and a small window will pop up with some useful information like the date, the open, high, low and the close price.
If you want to add technical indicators you can simply go to the charts window on the left and take your pick from what’s available. For example, you can drag a moving average from the left and drop it on to the chart. That will bring up some adjustable parameters.
You can set the moving average to use the close price or something else. And you can set the periods, the colour and the style. Click OK and the moving average overlays on to your price chart.
As you will learn, there’s a huge library of pre-built indicators like Bollinger Bands, MACD, RSI, MFI etc. You can also create your own indicators using Amibroker formula language.
If you want to zoom in, use the green plus arrow on the right hand side. Just below that you can also switch timeframes between daily (d), weekly (w) and monthly (m).
Chart Panes
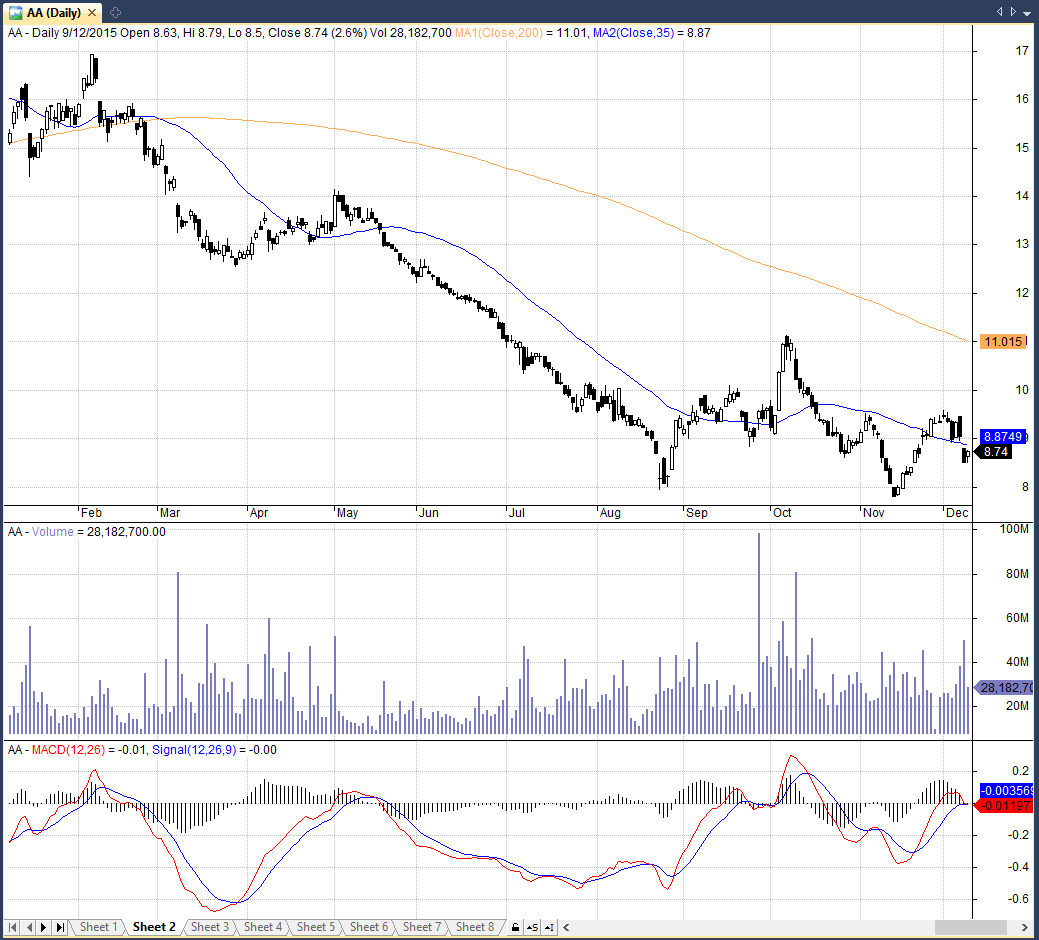
The price chart in the centre is called a window pane. In the graphic below there are three panes. A price chart takes up the top pane. Volume is in the middle pane and MACD indicator (moving average convergence divergence) is in the bottom pane.
If you right click on any of these panes it’s going to bring up some useful options.
For example, right click on the price chart and you can adjust any of your parameters such as your moving averages. You can also Edit the formula or delete any of the indicators. You can also move the panes around, maximise their size or remove them completely.
If you close a pane by mistake and end up without a price chart go back to the chart window on the left and hit the basic charts dropdown. Double click any of these items to bring up a brand new pane.
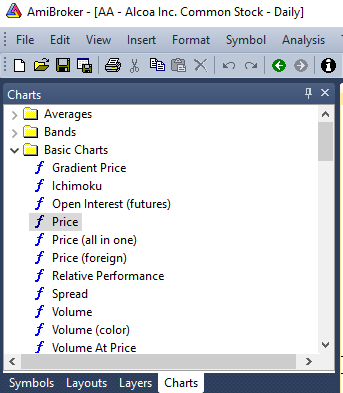
Price (all in one) brings up the price chart for the selected ticker complete with Bollinger Bands, volume and moving averages. Whereas double click just Price and the default price chart will return to your main chart window. Double click Price (foreign) and you’ll be able to plot a separate symbol, different to the already selected symbol.
For example, you can plot Apple in the top pane and then Microsoft in the bottom pane using the foreign chart.
This process works for anything in the charts window. Whether its price, volume or an indicator, everything will get its own new pane if you double click it.
Amibroker Sheets
As well as using chart panes, there are also sheets. You can have different charts and different indicators on the various sheets. There are 8 sheets available and you can rename each one.

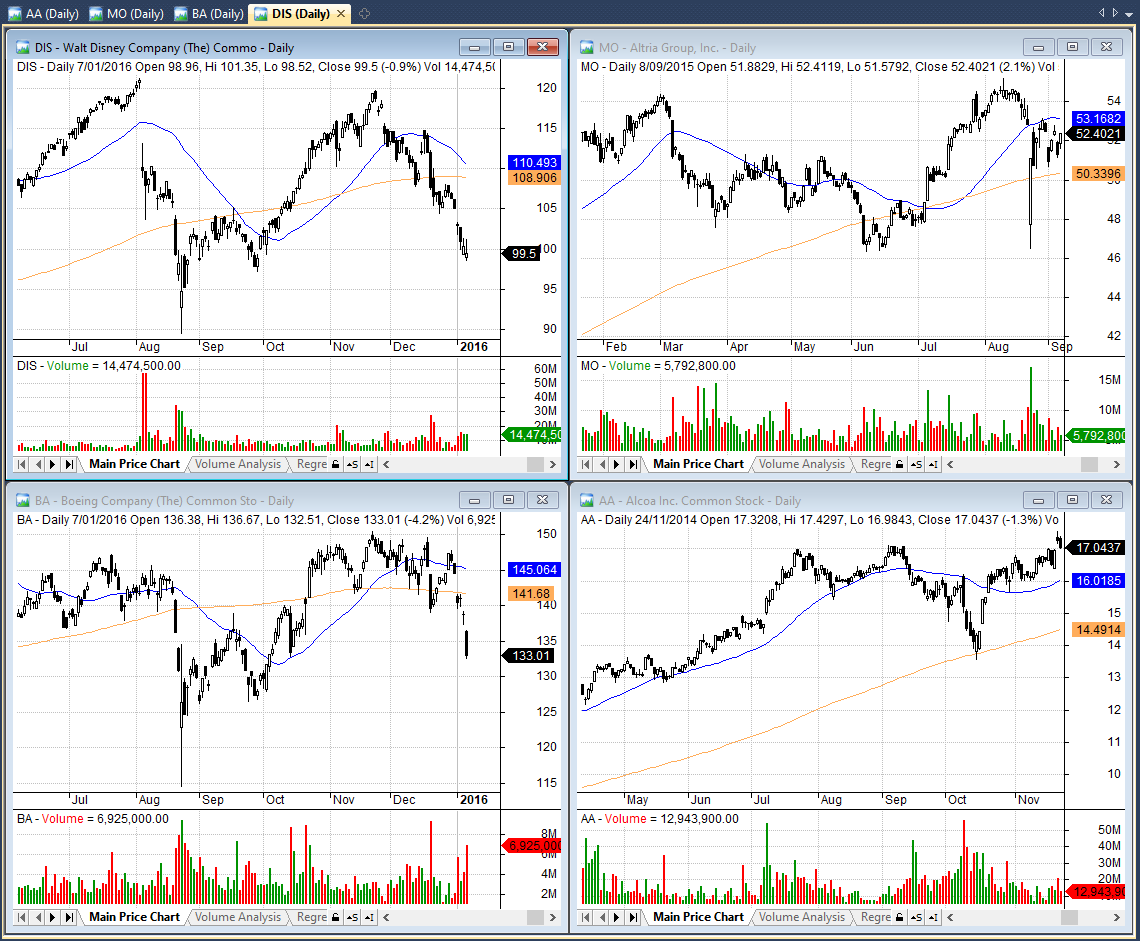
Another thing you can do is open up more chart windows. If you go to File >> New >> Default Chart, you’ll get a new chart window in it’s own tab. You can set the symbol to something else and then flick between the two charts to compare diffrences.
When you have multiple chart windows open you can click into the Window Menu and cascade them. You can arrange the windows vertically or horizontally. You can also make the windows floating and spread them over to another monitor.
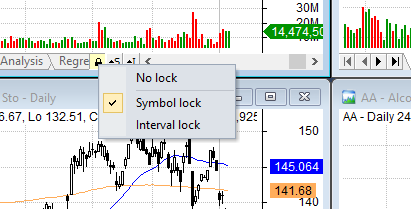
A useful feature with the chart windows is to use the padlock to lock a chart. Now the symbol in that chart won’t change if you pick a different symbol in the symbol window.
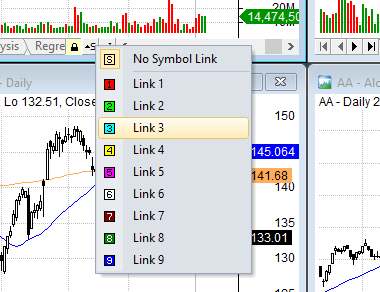
You can also link charts together. So if you set the symbol link to blue, every other chart with a blue symbol link is going to revert back to the same symbol.
Windows Menu
If you lose a window you can access it by going to the Window item in the Menu.
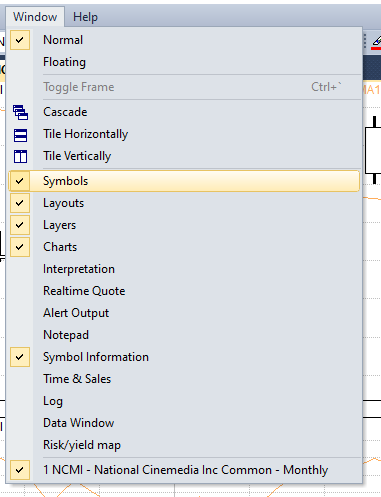
The Charts window lets you set up the different price charts. The Symbols window lets you search through different markets and watchlists to find the symbols you want. Symbol Information is going to show you additional details of the stock you’ve selected such as company name, address and GICS.
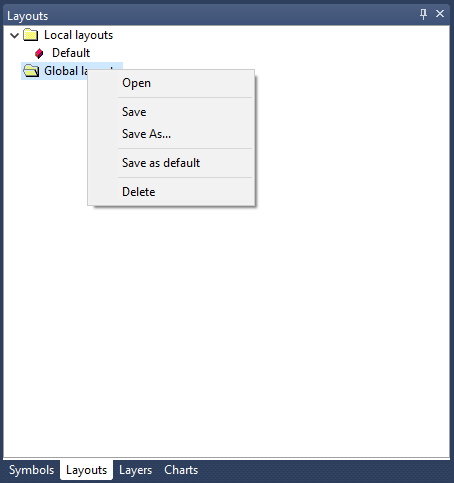
Layouts is where you can save the current workspace. If you save this layout locally by clicking right then Save As, you’ll be able to load up the layout again if it changes. If you right click Global Layouts and save it, you’ll be able to load up this layout in a different database.
Amibroker Drawing Tools
Amibroker also comes with a selection of drawing tools. Trend lines, horizontal lines, channels, pitchfork, circles. If you want to delete them just right click and delete all studies. There are also indicator drawing tools such as Fibonacci extension, Fibonacci arc, Gann square and Gann arc etc.
As mentioned already in this Amibroker tutorial, you can also create your own indicators by going into the formula editor. After writing the code for your formula you can clik Apply Indicator or Insert Indicator and that will plot it onto the chart or into its own pane.
You can also place indicators on top of other indicators. For example, the following graphic shows a 15-period moving average overlaid on top of a 2-period RSI:

Menus
In the View Menu on the toolbar, you can turn the cross hair on or off, change the style of the chart and the scale. You can also do that using right click.
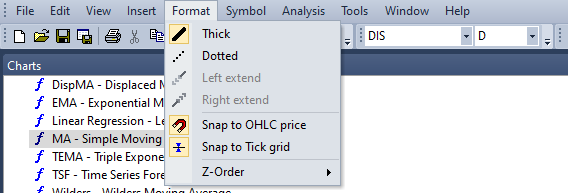
Insert is another way to insert drawings like trend lines, and zig zags and indicator lines which we talked about earlier. Format works with the drawings that you put on the chart.
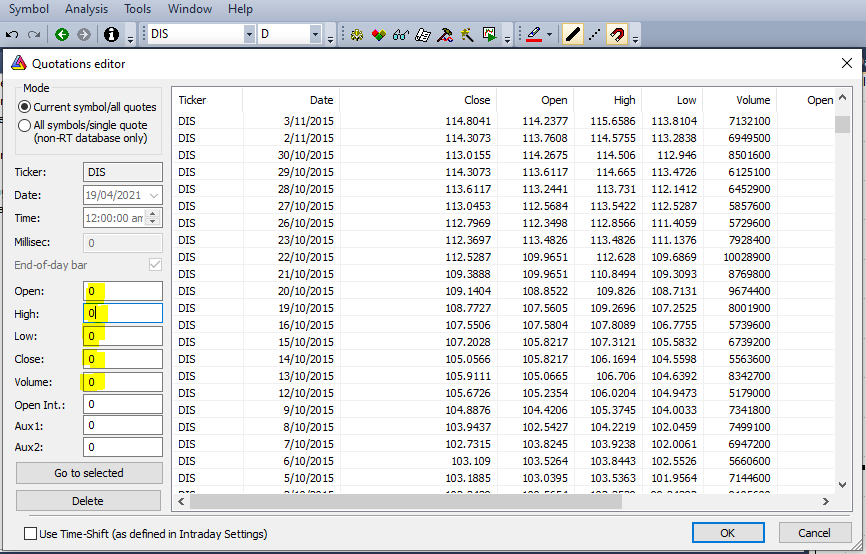
Symbols is where you can manage the different tickers in your database. You can create new symbols, delete symbols and create watchlists. You can also go into the quote editor to see the actual quotes for each symbol. This lets you fix any errors that you have found in the quotes.
Analysis is where you can open up the formula editor or new analysis window. This is where you do all of the strategy creating and coding and we’ll be looking at this more closely in the next sections. As always, the best way to learn Amibroker is to get stuck in and start experimenting.
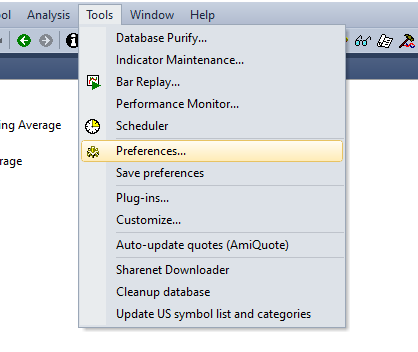
The Tools Menu is where you can purify your database, maintain indicators and set up third party plugins. You also use this menu to access Preferences to customise your setup. You can change the color of your charts and candlesticks and set up your time intervals.
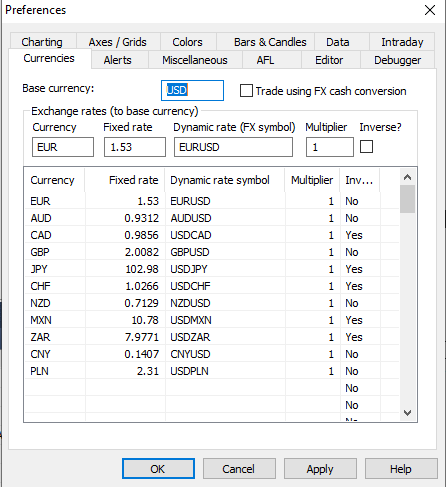
One thing you might want to look into is the decimal settings and the base currency. If you’re trading US stocks you’ll probably want to leave it as USD. But if you’re trading stocks from other countries this may need to be changed to the relevant country’s home currency.
Useful Tips
- Hit the little pin icon on any of the side windows and it minimizes them and pushes them to the edge. This is really useful if you’re running low on screen space. Hit the pin again to lock them in place.
- Use the scroll button on your mouse to move along the price chart instead of hitting the arrows. Hold CTRL + SCROLL at the same time and you can zoom in and out of the chart.
- Hold down SHIFT and left click the mouse on the Y-Axis of the price chart and that will let you adjust the scaling of the chart so you can more easily see all the price values.
- Always use right click on the mouse to bring up lots of options. For example, if you have a chart layout you like hit right click and then save that as a default chart.
- Double click anywhere on the price chart to leave two vertical marks (green and red) that you can use to remember important events or time frames. Double click on either of the lines a third time to remove them.
3. How To Use Amibroker – Analysis
Watchlists
When you start Amibroker, you create a a database and import your historical data for all your stocks. Obviously, a good idea is to organise your stocks into smaller groups so that you can easily do your analysis on them.
In Amibroker you can create new watchlists and put whatever symbols you like into them. A simple way to do that is to right click on the symbol in the symbols window, and then add the selected symbol to the watchlist you created. If you select more than one symbol amibroker will let you add those symbols all at once. You can also type in the symbols separated by a comma.
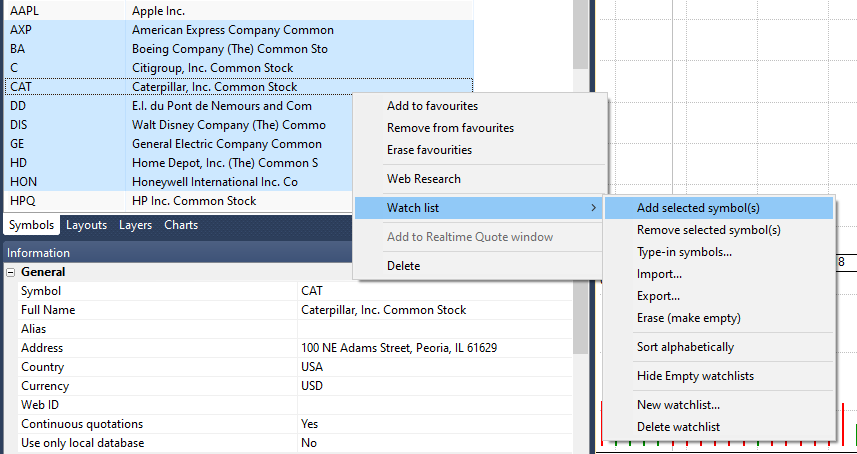
Whenever you add a stock to a new watchlist that doesn’t remove it from where it already is. For example, If you go to a watchlist that’s already set up and add a stock to a different watchlist, the stock is going to exist in both watchlists. To remove a stock from a watchlist you will need to right click on the symbol name then click watchlist >> remove selected symbol.
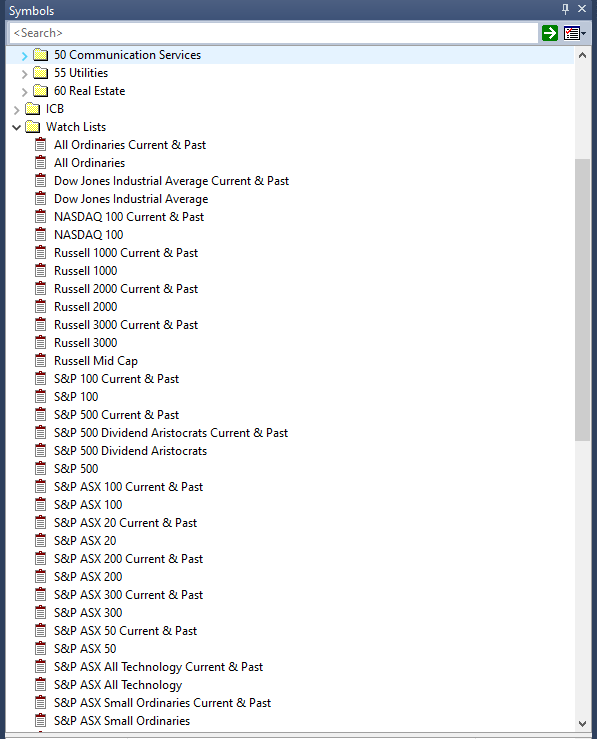
The main advantage of using watchlists is that you can sort your stocks into smaller groups and that will let you do your analysis more efficiently and quickly. It allows you to organise your stocks to create more logical backtests. If you have Norgate Data, you will notice that there is a sophisticated hierarchy of watchlists already set up:
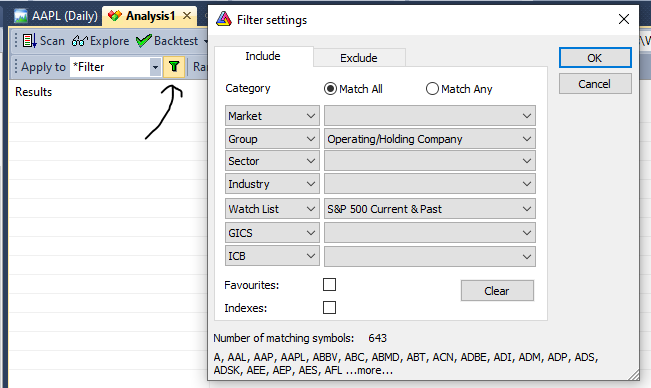
When it comes to backtesting or scanning, you open a new Analysis tab. Then click the small green funnel icon and select the watchlist that you want to scan or backtest on.
How To Scan Stocks In Amibroker
A scan is a quick way to search through a watchlist for any symbols that meet any of your buy and sell rules. These are the rules that you have written into the formula editor. For example, if you write the following formula and click Scan in Amibroker, the software will scan for all stocks with a close price above $10 and an RSI(14) value less than 20:
Buy = Close > 10 AND RSI(14) < 20;
A scan works well when you already have a strategy you trust. You simply need a way to find new trading signals so you use the scan function to return those on a bar-by-bar basis. Scans are quick and easy whereas explorations provide more control and customisation. That’s why I prefer to run explorations and rarely use the scan tool.
Amibroker Formula Editor
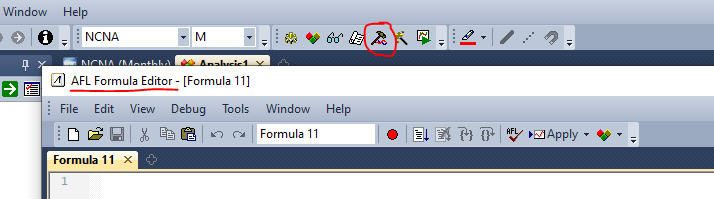
To get to the Amibroker Formula Editor you have to click into the small hammer icon. This is the starting point for writing any Amibroker AFL whether it is a scan, backtest, custom indicator or exploration.
Amibroker Tutorial – Explorations
An exploration is similar to a scan but you can customise the output. So with an exploration you can produce a much more detailed report.
To run an exploration, open up the formula editor. The first thing we need is a new variable called ‘Filter’.
Filter tells Amibroker which stocks to include in the analysis. So if you write Filter = 1, Amibroker will analyse all stocks in the data. If you type Filter = Buy, Amibroker will analyse all stocks that meet your buy rules. If you set Filter = C > 50 then Amibroker is going to analyse all stocks with a close price more than $50.
Once you have the explotation filter set up you insert the AddColumn code in order to arrange the results of the exploration into neat columns. There are text columns and number columns you can use which can be set to different decimal places.
For example if you write AddColumn(Close,”Close”,1.2); the exploration will return the close price of the stock you are looking at to two decimal places (1.2).
Explorations become powerful when you start to add all the details that you want to see for the stocks you’re interested in. Basically, it lets you create your own customised screens and reports.
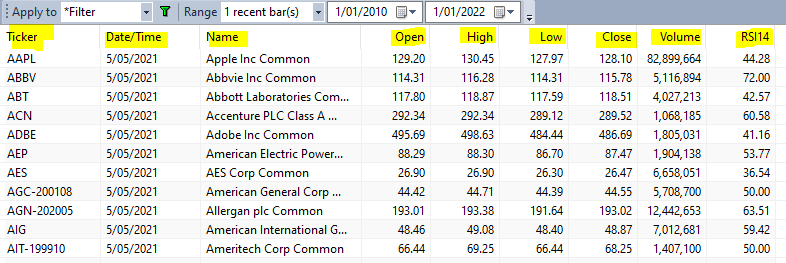
For example, the following Amibroker exploration afl code will create a report with columns showing the symbol name, the OHLC prices, volume and RSI(14) for every stock over $5:
Filter = Close > 5;
AddTextColumn(FullName(), "Name");
AddColumn(Open, "Open",1.2);
AddColumn(High, "High",1.2);
AddColumn(Low, "Low",1.2);
AddColumn(Close, "Close",1.2);
AddColumn(Volume, "Volume",1.0);
AddColumn(RSI(14), "RSI14",1.2);
Using Norgate data it is possible to run some sophisticated explorations that make use of variables such as market cap, P/E, P/S, EPS growth, analyst price targets and more. For more info see How to screen for stocks with Norgate.
Export Amibroker Data To CSV
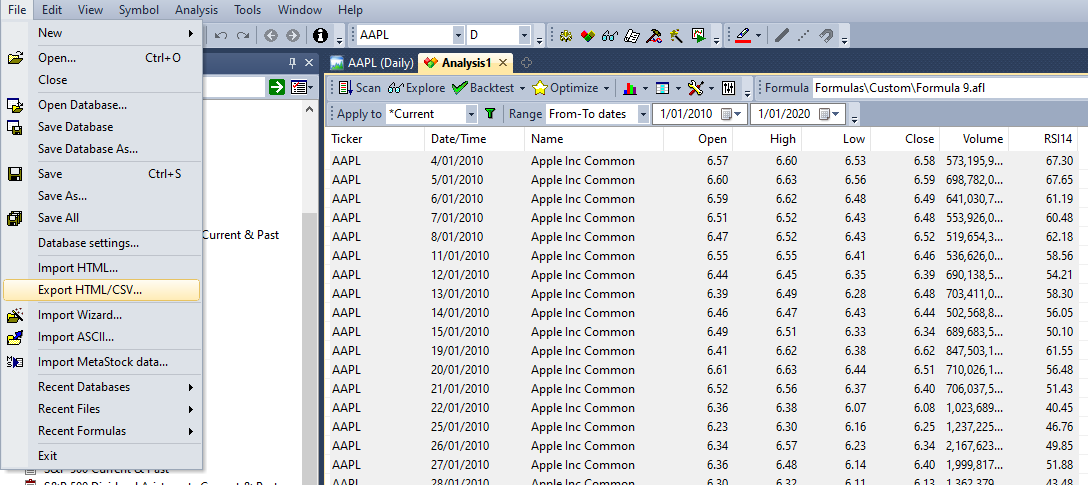
Another useful thing you can do is to run an exploration on the data and then export that out into excel. For example, if you run an exploration code like below you can produce a report that contains all of your OHLC and volume quotes.
Filter = 1;
AddColumn(Open, "Open",1.2);
AddColumn(High, "High",1.2);
AddColumn(Low, "Low",1.2);
AddColumn(Close, "Close",1.2);
AddColumn(Volume, "Volume",1.0);
After running the exploration across all bars Amibroker will provide you with the quotes for those stocks. You can then select all the data in the analysis window and use copy/paste. Or you can click File >> Export CSV. This will let you save the quotes as a CSV file. You can then load it up in Excel. In other words, you can successfully export data from Amibroker into CSV format for analysis elsewhere.
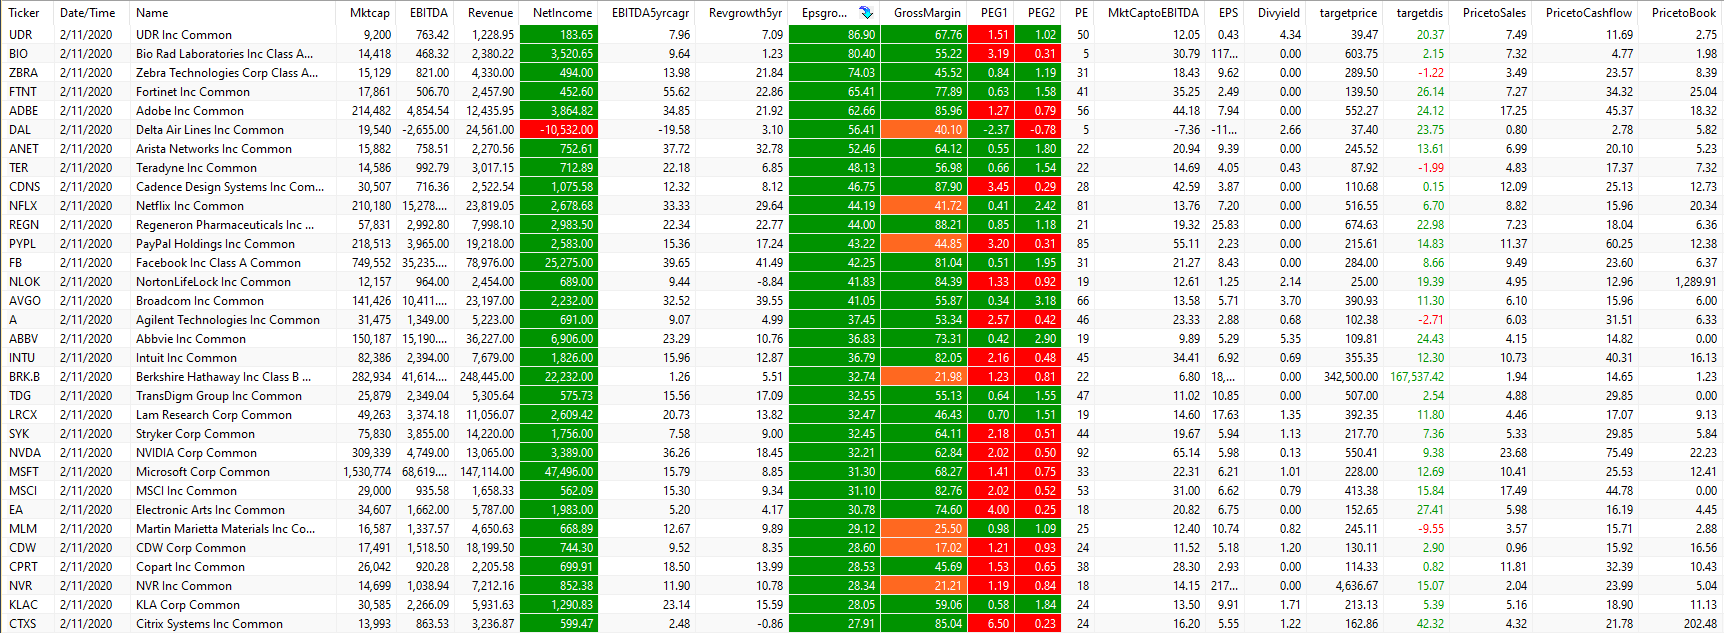
Hopefully you can see how powerful explorations can be. I use exploration regularly to run detailed stock screens and it can be customised with different colors. The following graphic shows an example of a more sophisticated exploration that I’ve set up. This screen encompasses technical and fundamental metrics:
Amibroker Backtesting Tutorial
Backtesting is one of the most important features of Amibroker.
The way it works is you write your code in the Formula Editor. You set your symbols in Apply to Watchlist. You set the date range and then you check your Backtester Settings by clicking the spanner icon. Then you just click Backtest and Amibroker runs through the data, bar by bar, processing your rules. It then reports the results in a couple of different formats.
One thing you should do is put as much of your trading rules into the AFL code as possible. You don’t want to rely on the backtesting settings window because it’s too easy to forget how you set it up from run to run. If all the rules are written into your AFL then you don’t really need to touch the backtester settings at all.
If you look at the backtester settings more closely, almost everything in there here can be written directly into your code, mostly with the SetOption functions. This is shown in the example below:
SetFormulaName("Your First System");
SetOption("InitialEquity", 100000);
SetOption("CommissionMode", 3);
SetOption("CommissionAmount", 0.01);
SetOption("AllowSameBarExit", True);
SetOption("MaxOpenPositions", 20);
SetOption("AccountMargin", 50);
SetOption("UsePrevBarEquityForPosSizing", True);
SetOption("AllowPositionShrinking", True);
SetOption("MinShares", 0.2);
SetTradeDelays(1,1,1,1);
SetOption("ActivateStopsImmediately", True);
SetPositionSize(5,spsPercentOfEquity);
Once you have taken care of the intitial backtester settings you can move on to your backtest rules. These are your rules which tells Amibroker when to buy and sell.
For example, the following code tells Amibroker to enter a buy order when the 50-day moving average crosses over the 200-day moving average. It enters a sell order when the 50-MA crosses back under. In addition, we place a 20% trailing stop which is applied using Amibroker’s built-in ApplyStop function:
Buy = Cross(MA(C,50),MA(C,200));
Sell = Cross(MA(C,200),MA(C,50));
ApplyStop(stopTypeTrailing,stopModePercent,20,2);
This trailing stop moves 20% below the recent high. The number 2 signifies that the trade exit will be placed on the next bar. If we were to use 1, then the trade exit would occur at the trade price (intraday). There are different ways to set up the ApplyStop settings as shown in this article.
The next thing you’ll need to do is to tell Amibroker what price field you will use for your entries and exits. When using end-of-day data you generally want to specify either the open price or the close price. If trading intraday then you can set up a limit price of your choice:
BuyPrice = ShortPrice = Open;
SellPrice = CoverPrice = Open;
Another thing you’ll want to consider is your Amibroker ranking criteria. When you write your entry rules in Amibroker you may end up with more than one candidate and so you need a way to choose between them. For this, Amibroker includes a variable PositionScore() which allows you to rank all the stocks that meet your rules. PositionScore tells Amibroker to choose the highest scoring symbols first.
For example, the following AFL will rank all of your buy signals according to the RSI(14) indicator. It will then choose the higest scoring candidates. i.e. it will buy the stocks with the highest RSI(14) first:
PositionScore = RSI(14);
Alternatively, you can ask Amibroker to choose the lowest scores first by substracting from or inverting the formula. For example, the following formula will now pick the lowest RSI(14) scores first:
PositionScore = 100 - RSI(14);
Putting all the above code together gives us a very simple Amibroker trading system. We are starting with $100k, trading a moving average crossover with a 20% trailing stop and placing all of our entries and exit orders on the next day open. We can hold a maximum of 20 positions in our portfolio, we use commissions of $0.01 per share and 50% margin.
To run the backtest, first Send the formula to the Analysis Window.
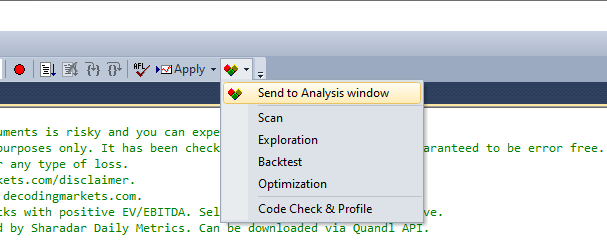
Now the formula has been loaded into the Analysis Window you can set the dates you want to test and the symbols by clicking on the green funnel icon. Then hit Backtest and the backtest will run.
Amibroker reveals the results of your backtest in three main ways.
- In the Result list tab you can see details of individual trades that the backtester took.
- In the Info tab, you can see a quick summary of the backtest results including profit, CAR, drawdown and win rate.
- In the backtest report you get a 7-page report covering all your backtest statistics and equity charts. You access this by clicking the table icon.

Result List And Graphics
A useful feature of Amibroker is being able to clearly see every trade taken by the backtester in the Result List. This tab is found at the bottom of the screen while in the Analysis Tab. This is the first thing you should look at to make sure that the backtest is actually doing what you expect it to do.
Once you are in the Result List tab you can right click on any trade and click show current trade arrows. That action will place trade arrows into the price chart window. You can then go back to the chart and see if the trades are taking place at the right times.
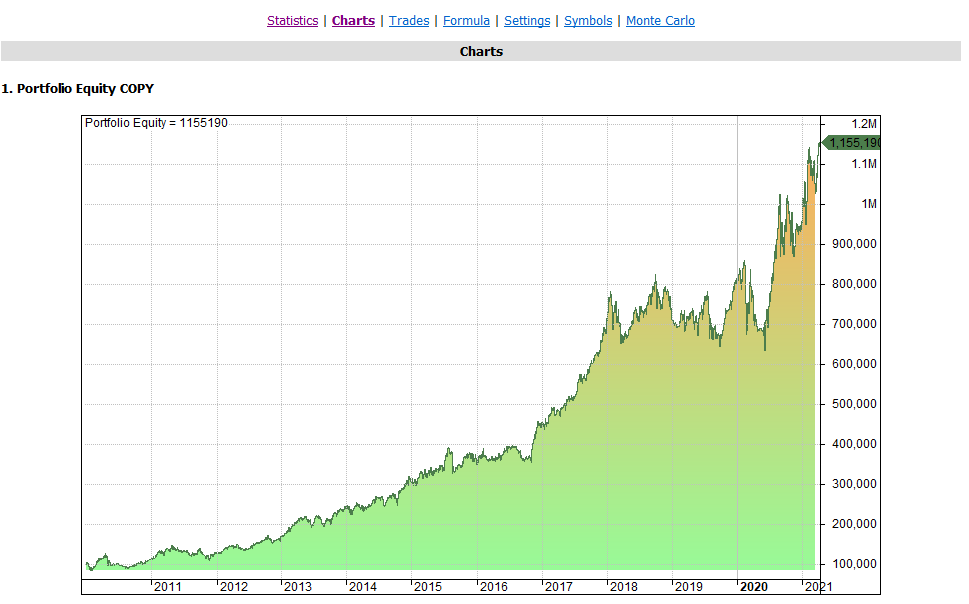
Once you are satisfied that the system is doing as you expect it you can move on to the detailed backtest report. This report shows you numerous statistics as well as equity curves, drawdown charts, profit tables and monte carlo runs:
Learn Amibroker Optimization
An optimization lets you backtest many different settings at once. For example, instead of running one backtest using a 200-day moving average, you could run 10 backtests at once analysing every moving average length from 50-days to 500-days.
This means you can quickly test numerous parameters at once and get a clear idea of what works and what doesn’t. By testing a broad range of variables you will typically find a sweet spot where your system works best. You can then drill further down into this sweet spot to find the best performing parameters.
As an Amibroker system developer, it’s important to be wary of over-optimization which can lead to curve fitting. It’s crucial not to pick the best parameters but to look for the most robust. Robust parameters are those that are based on a large sample of trades and which are surrounded by similar strong performing parameters.
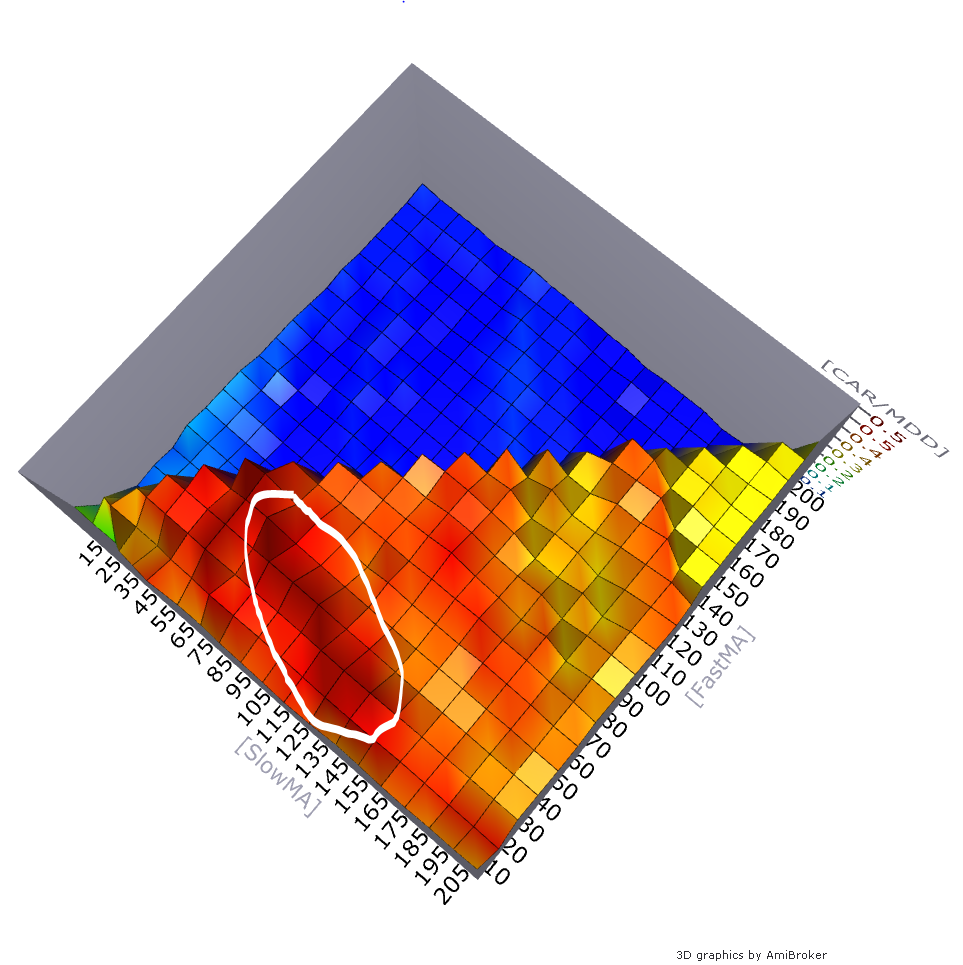
For example, the following graphic shows a basic optimization report for a moving average crossover test. The graphic shows that there are many different combinations of moving average that produce resonable results. However, there is a definite sweet spot of performance which I have circled in white. Values in this range are more likely to be robust since the performance is more consistent within this range of values.
To run an optimization in Amibroker we can create a new identifier in our AFL code and then instruct Amibroker to optimize the parameters.
Using the formula below as an example, the optimization starts at a 50-day moving average, it then tests every moving average length up to 500 in steps of 10. The figure 200 is the default moving average that will be applied if an optimization is not run. For example, if you run a backtest and no optimization:
MAlength = optimise("MAlength", 200, 50, 500, 10);
FastMA = MA(Close, MAlength);
In other words, this code enables us to test every moving average length from 50 to 500 in steps of 10.
The more variables and steps involved in the optimization, the longer the optimization will take. The code below optimizes three different variables, fast moving average, slow moving average and stop loss.
FastMA = optimize("FastMA", 200, 50, 500, 10);
SlowMA = optimize("SlowMA", 200, 50, 500, 10);
Stoploss = optimize("Stoploss", 5, 1, 20, 1);
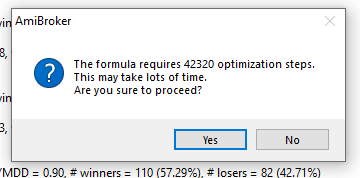
Amibroker will test every combination of the three settings above. This results in 42,320 separate backtests/combinations. The speed of the optimization will depend on the power of your computer and the number of stocks being tested on.
Amibroker also offers smart optimization techniques using several non-exhaustive algorithms; SPSO (standard particle swarm optimizer), TRIBES (adaptive parameter-less PSO) and CMA-ES (Covariance Matrix Adaptation Evolutionary Strategy optimizer).
These techniques speed up the optimization procedure by focussing on the steps of the optimization that are most likely to be useful. For example, once the algorithm finds a setting that is optimal it may skip all nearby steps greatly speeding up the process.
Optimization is a fast and powerful tool. As mentioned, its important not to over-optimize but to use optimization to find robust patterns and market truths.
Walk Forward Analysis In Amibroker
Walk forward analysis is another powerful feature for trading system developers. Other platforms seem to find this technique difficult but in Amibroker it is a breeze.
The idea of a walk forward optimisation is to optimise your system on some in-sample data, then test it on out-of-sample data, using the best parameters that were found in-sample. You then move forward and do it again, until you have reached the end of the data.
Next, you concatenate (stitch together) all of the out-of-sample segments to get a performance summary that consists only of the out-of-sample parts. This is a great way to produce less biased backtest results since you are building a system based only on the out-of-sample results.
Using a walk forward method is similar to how you might approach real trading. You have an idea of what works and then you go and trade it in the live market. When that doesn’t work you go back and change things around. Using a walk forward analysis you can get an idea of what would happen if you did that. First by optimizing the search and then by validating it repeatedly on different segments of out-of-sample data.
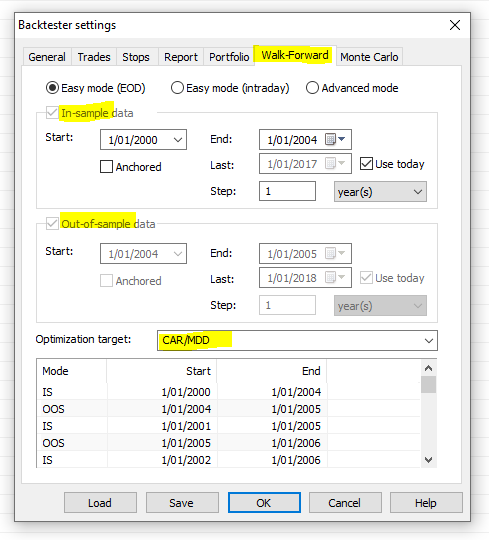
To run a walk forward analysis you first set up an optimization, just like we did earlier. You then need to adjust some items in the backtest settings on the Walk Forward tab. You will need to set your in-sample and out-of-sample dates and select the optimization target.
The optimization target tells Amibroker which metric to benchmark performance by. For example, do you want to select the strategy that makes the most profit or the smallest drawdown?
For a walk-forward analysis to be effective you need to use enough data in the in-sample period to give you a large enough sample of trades. You can then use an out of sample that is maybe a third the size of the in sample.
For example, I might use an in-sample period that lasts five years and generates 1,000 trades then use a walk-forward sample of two years.
Essentially you are optimising the system over 5 years of data, then you take the best variation of the system and backtest it on the next two years of unseen data.
The process steps forward and we do it again. The optimisation target can be altered to anything you like. I usually keep it at CAR/MDD which measures the annual return against the drawdown.
Once the walk forward is done Amibroker is going to stitch together all of the out-of-sample segments. This will give us a good idea of how the system would have performed if we’d utilised this optimisation technique. If you want to learn Amibroker and learn how to build good strategies, walk-forward analysis is a powerful tool.
Learn Amibroker IB Auto Trading
Once you have a strategy tested and you’re happy with it there are several ways to trade it live. You can take a semi automated or fully automated approach depending on your programming skill and confidence level.
With a semi automated approach you let Amibroker do most of the heavy lifting. You use it to run the explorations and calculate the entry orders. However, you execute the trades manually by placing them directly into your brokerage account. This is the method I follow because I like to retain some control over my trades. It’s a good solution that takes only a few minutes each day to execute.
Alternatively, Amibroker has all the functionality to link directly with Interactive Brokers using the Amiboker IB controller. The IB controller is a piece of software that connects to TWS and is able to accepts orders and commands from Amibroker. This approach allows full automation, however, it does require a high level of Amibroker programming skill.
A final alternative is to use thirdy party software to link Amibroker with Interactive Brokers. This is approach requires additional software but is a less complicated process than using the IB controller. I go into this in more detail in this post on automation with Amibroker.
Amibroker Analysis Round Up
Backtesting, optimization and walk forward analysis are powerful tools for traders. But you have to treat them with care because you don’t want to engage in curve fitting. Curve fitting occurs when you over-optimize on your data. You create a strategy that performs exceptionally on your in-sample data but is unlikely to perform well on unseen data.
The goal of a backtest is to find market truths, robust strategies that you are confident will work in the future. Once you’ve found a good trading strategy, follow it in the live market to make sure it works as planned.
4. Learn Amibroker Formula Language
Amibroker Formula Language (AFL) is a purpose built programming language. It was developed specifically by Tomasz Janecsko to make anlaysing financial data efficient and fast. It’s also an array processing language, meaning data is stored as rows or vectors. In this section of our Amibroker tutorial we will look more closely at how arrays work.
Amibroker Code Tutorial – Arrays
An array is a container that holds a fixed number of values of a single type. The way I understand arrays is that an array is simply a list of data. But instead of this list going down the page it goes across. So an array is a row of data similar to what you might see on a typical Excel spreadsheet.
For example, if you download all the closing prices of Apple stock, you’ll have a long list of numbers, and that list is an example of one array.
When you set up a database, Amibroker stores 6 arrays for each symbol. There’s an array for the Open, High, Low, Close, Volume and Open Interest.

Each value that is stored in one of these arrays represents one bar, or one period of time essentially. You import these arrays directly into Amibroker in the correct format such as from a CSV file. Amibroker then creates new arrays to calculate any formulas within the code itself. Amibroker reads the data, runs calculations and can present it in a chart.
The very first number in the array (in your list of data) is going to be the first bar on your chart. The last number in the array will be the most recent bar on the chart.
If you think of an array as a list of values that is ordered by date and then laid out on a horizontal time line with the first number in the list being the oldest and the last value being the newest.
For example, the following table shows data for the S&P 500. You can see that you’ve got seven rows of data, seven arrays. The first 6 arrays are default Amibroker arrays for the open, high, low, close, volume and open interest.
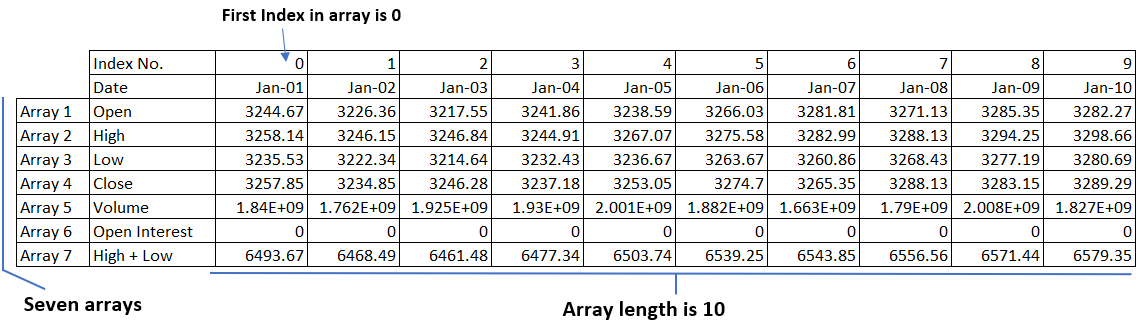
Each cell in the array represents one bar. The first bar in the array is given an index value of zero. Every other bar now has its own index value in relation to this first bar. You’ve then got an additional array (array 7) which is created by Amibroker to calculate the high plus low. This is just an example formula that we created in the AFL.
The way to call any number in an array is to put that number inside some brackets.
For example, the close price on the very first bar is written as Close[0] while the close price on day five is close[4] and the close price 10 bars along is Close[9].
An important distinction is that these are unique values. When we use square brackets we are referencing individual numbers not arrays. In other words, not the whole lines of the data.
For example, Value = Close[10]; gives us the close price on the 10th bar. But Value = Close; that gives us a whole array. It refers to the value of the close for each bar in the array.
Amibroker also provides a function called Ref(). This tells Amibroker to create a new array referencing a future or historical bar. For example, Ref( Close, -3) will create a new array that stores the close price from 3 bars prior.
One of the reasons Amibroker is so fast is that it doesn’t need to run through calculations bar-by-bar. Instead, by creating arrays it can perform calculations in just one stage.
For example, if you write Value = (High + Low)/2, Amibroker will create a temporary array that stores the first part of the calculation (high + low). A final array is then created to store the end value (high + low) /2.

Another good example is if you write the formula Upclose = If (close[5] > open [5]). You’re saying if the close on the 5th bar is higher than the open of the fifth bar then return a true result.
But If you write UpClose = if(close > open) without the number 5 in brackets, then you’re saying return a true result for every bar that the close is higher than the open.
The first example is looking at a precise point in the data while the second is calculating the result on a bar by bar basis, so the result is an array. This second type is generally whats used when running backtests and doing analysis.
By the way, in this second instance, it’s simpler to write UpClose = Close > Open. It will give the same result, but it’s cleaner. The ability to simplify calculations like this is what makes Amibroker fast. Every bar, Amibroker is going to run a calculation to see if the close is above the open and then give us a true or a false.
Amibroker IIF Statements
The IIF() function can be used to return a value that is different from true or false. Remember that this is IIF and not to be confused with IF.
So if you write UpClose = IIF(Close > Open, Close, Open) you’re saying ‘if the close price is greater than the open, return the close price, otherwise return the open price’. You can then use the result from this formula in another place. Perhaps lower down in your trading system code.
Now UpClose is its own array. It contains either the close or the open, on a bar by bar basis, depending on whether the bar is an up day or down day. Obviously you can do all sorts of more complex calculations with this.
5. Amibroker Tutorial – Tips And Tricks
A Trick For Writing Amibroker AFL
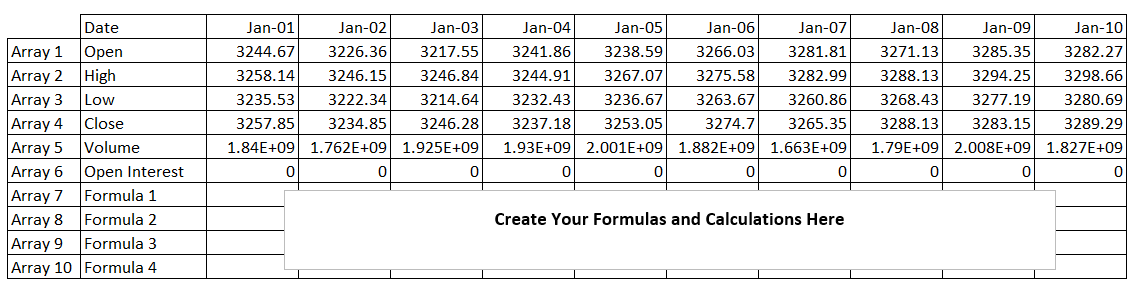
A trick for progamming Amibroker AFL code in the beginning is to start off with a spreadsheet. Lay all the data out in rows so you can get an idea for how Amibroker looks at the data and does its calculations.
For example, set up 10 columns in Excel, with 6 rows; open, high, low, close, volume and open interest. Underneath these, you can set up additional rows to store your calculations.
Often you can do the calculations you need with simple math. Always check the amibroker function reference as it provides lots of pre-built functions to speed up your workflow. You can do all sorts of complex calculations in Amibroker like standard deviation, moving average, MACD, RSI with just one line of code.
When you really get to grips with Amibroker you can get into more advanced stuff like the custom backtester which allows you to take full control of the Amibroker backtest engine.
For the most part though, you can do most of what you need without getting too deep. The beauty of arrays and in-built functions is that many sophisticated formulas can be written in just a few lines of code.
One of the most important things to remember when you learn Amibroker is that there is always more than one way to do something in Amibroker. So don’t worry too much about finding the perfect solution. Work out what you need on a piece of paper first. Sometimes it’s best to work backwards. You can use a spreadsheet as a tool to work through your steps.
Amibroker AFL Code Examples
Before we move on, here are a few useful formulas and functions to remember:
Min() & Max() can be used for finding the minimum or maximum value in two arrays.
For example Min(Close,Open) is going to return the smallest of either the close or open price. If it was Max() it would return the highest of those two arrays.
HHV() & LLV() finds the highest value or lowest value in an array.
100DayHigh = HHV(C,100); returns the highest close value over 100 bars. This is how you might start to code a breakout system. For example Buy = C>Ref(HHV(C,100),-1); Here, you are telling Amibroker to buy when the close is above the highest close in 100 bars.
StDev() is used for a moving standard deviation of an array.
Sum() can be used to sum all of the values over the last n number of bars.
For example Sum(H,10) is going to add up all of the last 10 highs together. You can use that result in another formula.
Cum() is the cumulative sum of the values in an array since the very beginning of the array.
This can be used to add up events. For example you can count the number of times the close has finished higher than the open since the very first bar. That would be UpCloses = Cum(C>O); That will tell you how many up closes there have been in the whole data.
LastValue() gives the final value in an array. This is useful if you want to tell Amibroker to exit a stock on the very last bar. For example if it gets delisted.
Ref() is used to reference previous or future bars. So if you think back to the concept of data laid out like in a spreadsheet and use the ref function to either step back or forward along each bar.
For example, Ref(Low,-20); returns the low price from 20 bars ago.
It’s generally fine to look backwards with the Ref function but always think about the dangers of referencing future bars when you design a trading system. You don’t want to create rules that are based on unknown information.
BarsSince(); returns the number of bars since the array returned true. For example, if you write BarsSince(RSI(14)>80); you will get the number of bars since the RSI indicator was more than 80.
Learn Amibroker Indicator Formulas
Amibroker comes with lots of pre-built indicators that you can reference in your code.
MA() is a simple moving average, so to write a 50 period moving average of the close you simply write MA(C,50).
This also means you can calculate a moving average of any array you like. For example MA(H,50) calculates a moving average, not of the close, but of the last 50 high prices.
EMA() is the exponential moving average and is written just like the simple moving average.
You also have the double (DEMA) and the triple (TEMA) and there’s also weighted moving average (WMA) and a few others. (You can see which moving average works best here).
ATR() is the average true range so ATR(10) gives the 10-period average true range value.
RSI() is the relative strength index, which is a popular momentum oscillator. It is often used in mean reversion strategies too.
BBandTOP() and BBandBot() will return the top and bottom of a bollinger band so if you wrote Buy = C>BBandTop(20,2); you’re going to buy when the close is higher than the top bollinger band.
MACD() is the MACD indicator which stands for moving average convergence divergence.
MFI() is the money flow indicator which is a similar indicator to RSI but also takes volume into consideration. We have done some analysis about the RSI versus MFI here.
ROC() gives the rate of change, which is simply the percentage change over n number of bars.
Percentile() is quite useful and can be used to return the rank percentile value of an array. For example, Buy = Close > Percentile( Close, 100, 99) will return a buy signal if the close price is in the top 1% of closes over the last 100 bars.
6. Common Mistakes
In the final section of this Amibroker tutorial, let’s look at some common mistakes and how to avoid them.
Amibroker Coding Errors
One of the first mistakes beginners make when learning Amibroker is that they misuse the equals sign “=“. In Amibroker, “=” means assignment and not equality. In other words you use “=” to assign something a value.
If you want equality you should use two equals signs “==” so this means you’re looking for an exact match.
For example, if you write RSIValue == 70 you need the RSI value to match exactly 70 to give a true result otherwise you’ll get false. If you write RSIValue = 70, that isn’t going to work. It will simply assign the value of 70 to the RSIValue variable. That’s probably not what you want.
Another common mistake is when you have an IIF statement you might write something like:
Result = IIf( RSI(14 = 70 , High, Low ); // WRONG
That’s wrong because if you only use one equals sign then amibroker is not looking for an exact match. It’s simply giving your variable a value. What you really want to do is use:
Result = IIf( RSI(14) == 70 , High, Low ); // CORRECT
Now if you want to return a true result when something is not equal you must use” !=”
For example, Result = RSI(14) != 70; is going to return true whenever RSI does not match 70.
Another way you might do this is by using the NOT function. Amibroker makes use of other logical operators like AND, OR as well. For a full list of operators see the Amibroker reference manual.
Look Into The Future Error (Future Leak)
A major mistake to avoid is to make sure your system doesn’t look into the future. Make sure you’re not using future values in your code that you wouldn’t know at the time of trading.
A classic example of this is when your system trades on the open, but it relies on an indicator (for example the RSI) that uses the close price. For example, if you write Buy = RSI(14) > 80; and you use BuyPrice = Open with zero trade delays, you are committing a future leak error. The system is buying on the open but the indicator is calculated with the close.
In this instance you might want to use SetTradeDelays() to delay your entry to the next bar open. Look forward errors like this can sometime be sneaky and hard to spot so caution is needed. Always remeber, if your results look too good to be true there could be some issue like future leak somewhere in the code.
Using Unrealistic Entry/Exit Prices
Similar to the future error mistake you must make sure your system uses realistic entry and exit prices. Sometimes, you can get a situation where you get a trading signal but execute an unrealistic price entry. For example, when using limit orders.
Using a limit price such as BuyPrice = Open * 0.95 tells Amibroker to buy at a 5% discount to the open price. However, when using adusted stock data this type of limit price might cause an issue. Sometimes Amibroker might trade on the exact low of the day giving very little margin for error. This may be an unlikely price fill especially if the data is adjusted. It also ignores your market impact on the bid:ask spread.
In other words, if your system often enters on the exact low or high of the day, then it’s making unrealistic assumptions. It’s better to amend the formula above to something like below. This introduces some more realistic slippage to the entry price to make sure that your entry would have been filled in real trading:
LimitPrice = Open * 0.95;
Slippage = Low < (Limitprice * 0.995);
BuyPrice = LimitPrice AND Slippage;
In this example, we are still entering on a 5% discount to the open. However, we make sure that the low of the day is at least 0.5% below the limit price. This provides some margin of safety and ensures that the backtest enters a realistic price fill.
If we don’t use something like this Amibroker might trade on the very low of the bar. We would get extraordinary backtest results but they wouldn’t transfer to real trading.
Using The Wrong Data
When backtesting or running analysis in Amibroker it’s important to understand the data you are using.
- Is the data adjusted for stock splits?
- Is it adjusted for dividends and distributions?
- Does the data include historical members?
- How granular is the data? How accurate is it for your timeframe?
- For futures, is the data back-adjusted or spliced together?
- For forex, does the data represent the bid, ask or the midpoint? What broker is the data from?
These are some of the questions that need to be addressed when choosing a data provider and before backesting.
If you use data that is not adjusted for stock splits, then there will be many price gaps to be aware of. This might be OK if you trade intraday but it is not going to provide accurate backtest results for longer-term strategies.
Data that is not adjusted for dividends will likely lead to underperformance in the backtest. However, data that is adjusted could lead to erroneous entry signals (since the price is adjusted and not the actual price). The right approach is to test strategies on both types of data.
Data also needs to include delisted stocks and historical members. Stocks are removed from the exchange all the time and backtesting without these securities leads to survivorship-bias and distorted results.
If the data is daily be aware that testing intraday price fills is likely to be unrealistic. Intraday systems typically need 1-minute data or less to provide accurate simulations.
When using fundamental data be aware of the many adjustments and accounting discrepancies that can occur after the fact. For example, the Fed may release an unemployment number and later adjust it to something else (when they have more data). For an accurate backtest, you need to have the initial data point and not the adjustment.
Likewise, a data point might have a published date and a reported date. The reported date might be when the event actually took place and the published date is when it became public information. You need to know which one you’re dealing with as you cannot trade on information before it is in the public domain.
Not Exiting Delisted Stocks
Another mistake can occur when Amibroker holds a trade open in a delisted security. Typically, you want to exit any stock that has been delisted or merged with another company. If you see that your backtest results only has a small number of trades and a lot of open positions then check to see whether any of them are delisted stocks.
The following code uses BarIndex() to force close positions on the last bar in the database:
bi = BarIndex();
exitLastBar = bi == LastValue( bi );
Sell = exitLastBar;
If you use trade delays of one bar then you will want to trigger the exit one bar in advance:
SetTradeDelays(1,1,1,1);
bi = BarIndex();
exitLastBar = bi == LastValue( bi - 1 );
Sell = ExitLastBar;
If you use a third party database like Norgate Data then you may want to refer to the delisting date which has already been set for each delisted security in the database:
OnSecondLastBarOfDelistedSecurity = !IsNull(GetFnData("DelistingDate")) AND (BarIndex() == (LastValue(BarIndex()) -1) OR DateTime() >= GetFnData("DelistingDate") );
Not Setting Position Size Constraints
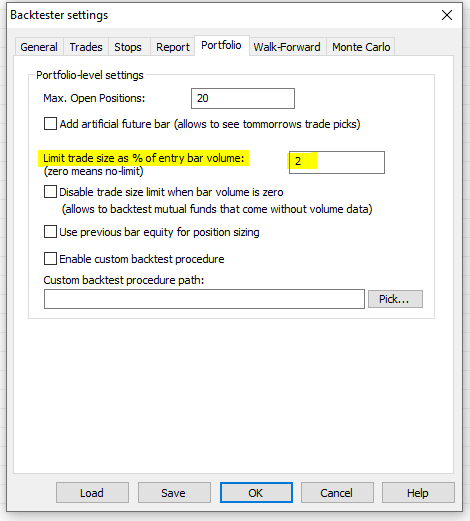
Finally, make sure any system you create is not buying an unrealistic amount of stock. For example, if a stock has a daily volume of 100,000 shares and you want to buy 50,000 shares, your order is going to have a big impact on the price and the bid:ask spread when you place your order.
In real trading, you’re probably not going to get filled at the price you want. But a backtest doesn’t know that and it will enter your entire position at the market price unless you tell it otherwise.
What you need to do is set volume constraints so that the backtest only ever buys a small percentage of the daily volume. This can be done in the backtester settings window. I usually set this to 2% of the average daily volume. This means my backtest entry cannot be larger than 2% of the daily volume of the stock.
Learning Amibroker – Final Thoughts
This article provides a quick start guide to learning Amibroker. It covers the parts of Amibroker that I personally find the most essential to success.
Whenever you build a system, make sure you set aside some time to debug it, go through each trade and make sure it’s doing what you want it to do. Focus on the end result and work backwards to see the steps you need to take. In Amibroker there are always different ways to tackle a problem.
Give yourself some margin of safety in terms of slippage and trading costs and pay close attention when the results seem too good to be true. Make sure to use quality data and be aware of over-optimization. Focus your attention on finding robust strategies instead of nice looking backtests.
Finally, always paper a trade a system first before going live as this is likely to show up any mistakes that you would have missed. Amibroker is a powerful tool but it is not a replacement for common sense and practical experience.
Notes: This Amibroker tutorial would not have been possible without the excellent resources in the official Amibroker tutorial and reference manual. This should be your first port of call if you want to learn Amibroker. Thanks to Amibroker for providing such a great software and support manual.
Really Fantastic Sir. I love this website.
Thanks mate.
Great article indeed!
Thanks.
This is by far the most comprehensive article on Amibroker that I have come across. Many websites just give a glimpse of what can be done without getting into the depths of it (unless one enrolls for some course of theirs).
Thank you
You’re welcome!